Install Pentaho Data Integration CE 8 on Ubuntu
Hi my fellow Devs! It's
been a while since I posted last post on Pentaho DI due to some unavoidable
circumstances and I did not wanted to post some random post as I always prefer
quality content over quantity. Hereafter, I will be posting frequently and more
awesome topics are on the way.
In this post, we are going
to see how to install Pentaho Data Integration on Linux (I have used Ubuntu for
this tutorial but it is pretty much the same for other Linux Distros like
Fedora, CentOS etc).
I have also written a post
on how to do the same in a Windows Operating System here. If you are new to Pentaho ETL, please
have a look at this blog post Pentaho Data Integration Basics.
The basic requirements to
install Pentaho Data Integration CE (aka PDI aka KETTLE) on Ubuntu Operating
System are as follows:
- Pentaho Data Integration Community
Edition
- Ubuntu 16 or above
- JDK 1.8 and above (Java Development Kit)
Step-1: Downloading the Pentaho Data Integration (PDI/Kettle) Software
Obviously, the
first step to install Pentaho Data Integration on Ubuntu, would be downloading
the PDI Community Edition from the Official Sourceforge download page. The recent
version is 8.2 at the time of writing this post and the download file is about
1.1 GB. The files will be downloaded as a zip file in the name
'pdi-ce-8.2.0.0.-342.zip'.
Step-2: Extracting the zip file
Extract the downloaded zip file which will be in the Downloads folder . Right
click the file and choose the 'Extract Here' if you want it to get extracted in
the downloads folder.
If you want to choose a
different folder, then right click and select 'Extract To...' option and give
the destination folder path. The default name of the extracted folder would be
'data-integration'. Leave the folder name as it is and note down the path of
this folder as it will be used in the following steps. In my tutorial, I am placing it in the following path:
Step-3: Checking Java Availability
Since Pentaho is
written on Java, it is required for us to install Pentaho Data
Integration CE on Ubuntu or in any OS for that matter. Go to desktop and right
click anywhere on the desktop screen and select 'Open Terminal' and in the
terminal command line screen, type:
and type it in lower case as keywords are
case-sensitive. If the version information is displayed similar to the one
shown in the screenshot below, then we are good to proceed with the next step.
 |
| Fig 1. Checking Java Availability |
If you did not get version info, then you need to
download and install Java into Ubuntu first. There is a very good instruction
on downloading Java and setting environment variables, is provided in
this link: How to Install Java on Ubuntu. This instructions
can also be utilized for other Linux distributions. Once this is done, continue
with the next step.
Step-4: Launching Spoon
The last step would
be to launch the Spoon application. For this, go to folder where we have
extracted pdi (data-integration folder) earlier in step-2. Right click within
this folder and select 'Open Terminal' and type the below command:
Alternatively, you can start the Spoon as super user by adding 'sudo' prefix.
This will ask for system password.
 |
| Fig 3. Starting Spoon Application with sudo command |
Once entered, Spoon application will be started.
 |
| Fig 4. Pentaho Data Integration Start Screen |
Bonus Tip:
Once, Pentaho Data
Integration tool is installed in Ubuntu, we need to launch the Spoon
application which is GUI where we can create ETL jobs and transformations.
Instead of opening Spoon every time via terminal command line window (which can
be frustrating at times), we can make it start by double clicking the spoon.sh
shell script as executable program, so by double-clicking the Spoon, we will be
able to open it.
For this, go to data-integration folder and select spoon.sh file and go to Preferences option in the top.
 |
| Fig 5. Accessing Preferences in the File explorer |
Go to Behavior tab and set as per the below screenshot:
- Select
'Double Click to open items'.
- Enable
'Show action to create symbolic links'.
- Select 'Ask what to do'.
After setting the options, close the window.
 |
| Fig 6. Setting Behavior in Preferences |
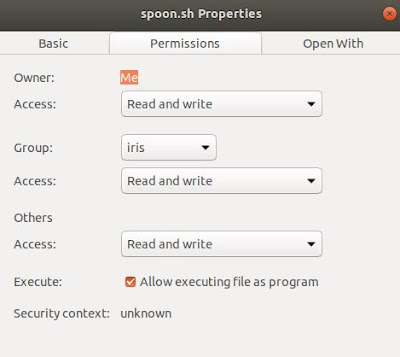
Next, right click the spoon.sh file and select
properties and go to Permissions tab and enable the check box 'Allow executing
files as program' and close the window.
 |
| Fig 7. Spoon.sh properties |
Right click the spoon.sh file and select 'Create
Link' and a link (similar to shortcut in Windows OS) will be created as shown
below:
 |
| Fig 8. Create Link for Spoon.sh |
 |
| Fig 9. Link created for Spoon.sh |
Cut the Link file and place it in the Desktop area. Select the file again and press F2 and rename the file by removing 'Link to '.
 |
| Fig 10. Renaming Link to Spoon.sh file |
Once again, right click the Spoon.sh file
in the desktop and select Properties, click the small icon box and it will open
a file manager window to select new icon for the file.
 |
| Fig 11. Open the properties for Spoon.sh |
 |
| Fig 12. Changing icon in Properties window |
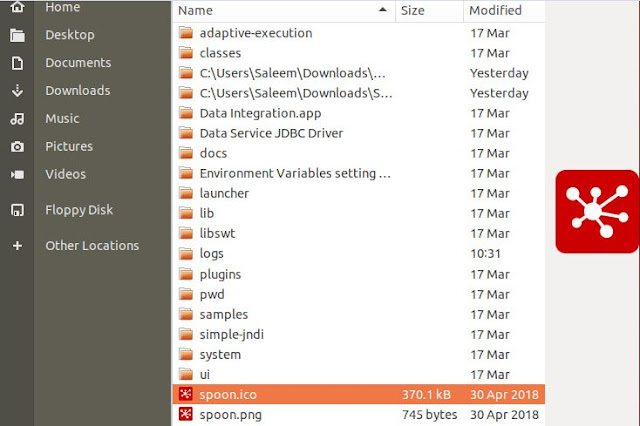
Navigate to the data-integration folder and
choose Spoon.ico file and close the window.
 |
| Fig 13. Choosing spoon.ico |
Launch Spoon by double-clicking the
Spoon.sh in the Desktop and in the selection window, click on 'Run' and it will
open the Spoon.
 |
| Fig 14. Final Spoon.sh Shortcut in the Desktop |
 |
| Fig 15. Choosing Run option in File execution choice window |
Quick Summary:
In this post, we have
discussed:
1.
How to install Pentaho Data Integration Community Edition on Ubuntu or in any Linux
Distributions.
2.
The installation requires Java in the Linux Machine. If it is not already
installed, link is given above in the Step-3 of the instructions from
downloading to configuring the Java.
3.
As a additional tip, provided the details on how to make a link(shortcut) to
Spoon application on Desktop and running from it instead of starting it from
terminal every time.
Hope this post is useful to you. Please leave a comment if it helped you/if you have any queries.


