Install Pentaho Data Integration (CE) on Windows - A Detailed Step-by-Step Tutorial

Install Pentaho Data Integration (CE) on Windows - A Detailed Step-by-Step Tutorial

Hi fellow Devs! Hope you had a wonderful day. Today's tutorial is all about how to download and install Pentaho Data Integration (Community Edition) in Windows laptop/desktop.


For those who are new to ETL process and PDI/Kettle, check my blog post:


When I was new to Pentaho, I was having difficulty in installing particularly the configuration part. I have searched internet and learned those things by trial and error. Hence I thought it will be worth sharing my experience.


The basic requirements are:

  • Pentaho Data Integration Community Edition
  • JRE 1.8 and above (Java Runtime Environment)
  • JDK 1.8 and above (Java Development Kit)
  • Windows 7 and above (Though PDI can be installed in Linux or Mac OS as well, the scope of this post is limited to Windows Operating System)

Step-1: Downloading the Pentaho Data Integration (PDI/Kettle) Software

The first step is to download the PDI Community Edition from the Official Sourceforge download page. The recent version is 8.2 at the time of writing this post and the download file is about 1.1 GB. The files will be downloaded as a zip file in the name 'pdi-ce-8.2.0.0.-342.zip'.


Step-2: Extracting the zip file

Extract the downloaded zip file which will be in the Downloads folder . Right click the file and choose the 'Extract Here' if you want it to get extracted in the downloads folder. 

If you want to choose a different folder, then right click and select 'Extract Files...' option and give the destination folder path. The default name of the extracted folder would be 'data-integration'. 


Step-3: Checking JRE version

Next step is to check the Java Runtime Environment version in your system. First check if your machine has Java installed. If not download it from official Java download page. 


If it is already installed, check for JRE versions. To do this, 


Go to C:\Program Files\Java\ (in case if it is 32 bit Windows OS) 
(or) 
check it in C:\Program Files (x86)\Java (in case of 64 bit OS).


Install Pentaho Data Integration on Windows
Fig 1. Screenshot showing the path containing JRE


There will be a folder within this folder path, starting with 'jre' followed by version number. This version should be 1.8 or higher. If this is the case, then we are good to proceed with the next step. 


If your PC/Laptop does not have JRE, we need to download the JRE 1.8 or higher version from the official Oracle JRE download page and install it. The recent version at the time of writing this post is '1.9'. We need to download the correct file according to OS type (32-bit/64-bit) and also select the file ending with '.exe' extension as it does not require any extracting tools. 


Once the file is downloaded, run the file and install JRE.


Step-4: Checking JDK version

The next step is to check the version of JDK in your Windows PC. This step is similar to the previous step.


Go to C:\Program Files\Java\


In the same folder, there will be a folder with a name similar to 'jdk1.8.0_191'. If you can find this folder, then we are good with this step. If the folder is not there, we have to download the JDK from the official Oracle JDK download page.


Like the previous step, we need to download the correct file according to our OS architecture type (32-bit/64-bit) and there will be multiple formats of the file will be available. Choose the file that ends with '.exe' extension and install the JDK by running the file after the download.

Install Pentaho Data Integration on Windows
Fig 2. Screenshot showing the path containing JDK folder


Step-4 Setting the Environment Variables


The final step is to configure the environment variables to point to the JRE folder path.
  • Open My Computer (or) press Ctrl+E. 
  • In the left side pane, right click 'Computer' for Win 7 (or) 'This PC' for Win 10 and select 'Properties' option. A new window will appear showing the Processor, RAM capacity, Computer Name, etc. 
  • Alternatively, navigating to Control Panel\System and Security\System can bring the same window.
  • On the left side pane, click the 'Advanced system settings' and it will bring the System Properties window. Go to 'Advanced' Tab and select 'Environment Variables' button.
  • In the Environment variables window, click the new button.
  • Give 'PENTAHO_JAVA' in upper case as variable name and folder path pointing to java.exe under the jre folder as variable value and click Ok. Please refer the screenshot below.

Install Pentaho Data Integration on Windows
Fig 3. Creating Environment variable - PENTAHO_JAVA


Again, create a new variable in the same way, but set the variable name as 'PENTAHO_JAVA_HOME' as variable name and  jre folder path as variable value like in the screenshot given below. 


Install Pentaho Data Integration on Windows
Fig 4. Creating Environment variable - PENTAHO_JAVA_HOME

Finally, create another variable in the name JAVA_HOME and the variable value would be the path where the jdk folder is available (see Step-4).

Install Pentaho Data Integration on Windows
Fig 5. Creating Environment variable -  JAVA_HOME


Note:


In the above step, example is given for 64-bit version of Windows. If your machine is 32-bit OS, replace the 'C:\Program Files (x86)\Java' string with 'C:\Program Files\Java' in the variable value for both the environment variables.


Restart your machine. Go to 'data-integration' folder which we extracted in the Step-2 and search for the file 'spoon.bat'. Double click it and PDI will open.


You can right click the spoon.bat file and select send to --> Desktop (create shortcut). This helps you to open PDI right from the desktop instead of going to data-integration folder every time.


It may be slow to start for the first time but it will not take more than 3-4 minutes. If you feel difficulty in any of the above steps, please let me know in the comments area. Happy Learning. 


Troubleshooting


For Win 7 32-bit, if PDI did not open after configuring as per step-4. Try this method.


Go to data-integration folder, select spoon.bat file. Right-click it and select rename. Change the file extension '.bat' to '.txt'. Now we can edit it in text editor like Notepad. Search for 'xmx256m' and replace it with 'xmx1024m' and save the file. 


Again, change the file extension back to '.bat' from '.txt'. Now double-click the spoon.bat file. It will open PDI aka Kettle.


In case of any queries, please let me know by writing it down in the comments section. 


Basic Overview of Pentaho Data Integration - A Beginner's Guide

Basic Overview of Pentaho Data Integration - A Beginner's Guide


For folks who are in the initial stages of learning ETL tools and workflow, PDI is one of the most popular if not the best open-source ETL tool and it is extremely user-friendly with nice and clean user-interface. It does not require any specific prior programming language knowledge to work with.

The ETL jobs can be developed completely by simply dragging & dropping necessary steps into designing work-space or canvas and connecting them into a network using links called 'Hops'.  The developed jobs can be scheduled to run automatically at set time intervals through the built-in scheduling features in the data integrator server and job status can be monitored from any internet browser by the authorized users and can send the job completion/failure status via email notifications with execution report as attachment. Job scheduling can also be performed using scheduling tools like Cron, Task-scheduler, etc.

Once you started using it, you are going to love it for the simplicity and very powerful features it packs. It can also be used for data-cleaning/conditioning requirements using various text/numerical operations available.

In this post, lets dive into  features and look and feel of this tool.

Jobs Vs. Transformations: What does each represent?


The term 'Job' under the PDI context, represents a combination of one or more jobs and transformations. Usually, the ETL code developed using PDI would have a single parent/master job which calls subsequent child jobs and transformations.

The term 'Transformation' is the primary layer which contains the actual transformations like sorting, any text operations, aggregation, filtering, formatting, removing duplicates, etc. to be performed on the data pipeline based on the business requirements.

The Job is the high-level layer which has the workflow rules like order in which the dependent jobs/transformations will be executed. Child jobs can be made to execute in parallel/serial manner if required. There is a provision to divert/redirect the workflow based on certain condition at Job level. Jobs are typically designed with START step at the beginning and with Success step at the end. We can even place an Abort Job step to end the flow if needed.

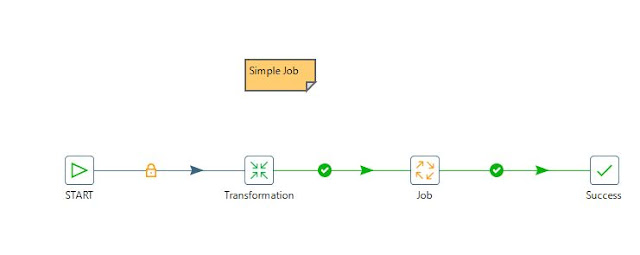
The below picture gives an idea about the elements in a simple Job.

Pentaho Data Integration Tutorial
Fig 1. Screenshot of a simple PDI Job


In short, we usually design any PDI/Kettle Job in a way that it calls the other Jobs and/or Transformations.

Job takes care of :
  • Workflow and execution of other jobs (this includes PDI job/Transformation, Sql query/Javascript/Shell script execution, Oozie job execution,etc.).
  • Folder and file management like creation/copying/deleting/moving files/folders, file transfer via FTP/SFTP. 
  • Evaluating conditions like checking if a file exists in the specified folder path, doing a simple evaluation eg. checking the value of a parameter or a column.
  • Checking if a table exists in a database.
  • Checking no. of rows in a Database table.
  • Truncating the records in a Database table.

On the other hand, a Transformation manages/processes data:
  • Extracting/Integration the data from various sources like Databases and Files.
  • Performing Lookup operation with reference data set.
  • String manipulation by removing a portion of a string value/concatenating an existing string with another string/replacing a specific characters of a string with alternate characters.
  • Number values manipulation by modifying the decimal places.
  • Converting Number format value to text format and string to number (only valid numbers in text format).
  • Removing the duplicate rows in a data set.
  • Merging the rows from two different data sources.
  • Replacing Null values with default values and vice versa.
  • Mapping the value of a column to another column.
  • Sorting the rows.
  • Creating a hash-sum value of a combination of values.
  • Renaming/removing a column name.
  • Loading the processed data to various targets like Database table/File output.

PDI Components

Pentaho Data Integration (also called Kettle or PDI) follows a cooking-related theme in naming convention for its components and they are listed below:

  • Spoon: Jobs are created using Spoon. It is where the jobs and transformations are created. It has graphical user interface using which code can be developed by simple drag & drop gesture as mentioned earlier in this post.

  • Pan: It is a command-line interface where we can run the transformations.

  • Kitchen: It is a command-line interface where we can run the jobs.

  • Carte: Helps to run the jobs/transformations in remote server mode.

Spoon Tool

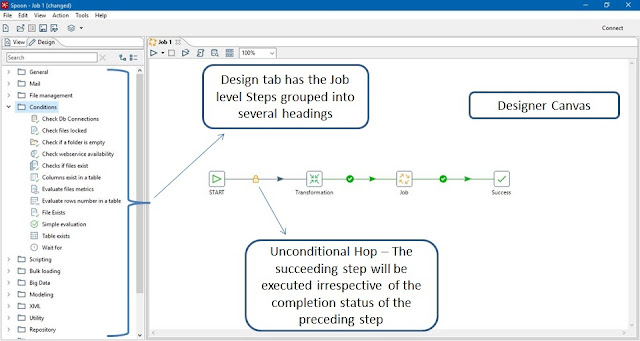
The Spoon is the PDI Client and it is where the Jobs and Transformations are created. Lets have look at the Spoon user interface:


Basics of Pentaho
Fig. 2. Screenshot of Spoon User-Interface and welcome screen

The above screen is shown when we open the Spoon tool. The left side pane has two tabs circled in blue in the above image: View (displays the list of objects present in current context) and Design (displays the list of steps that can be used to develop a PDI job or transformation).

Transformation Design

Transformation has steps (which are square icons with customize-able names available in the design tab in the left side pane which can be dropped into designer canvas) connected by lines with arrows called Hops. The steps can be edited by double-clicking or by right-clicking and selecting the Edit option.

Any two steps can be connected by a hop by clicking the first step and pressing the shift key in the keyboard and dragging the mouse pointer to second step. Alternatively we can join two steps simply by clicking the first step and four options will be displayed below the step in which we need to select the last option in the left and drag it to the second step. 

We can disable the Hop without deleting it so that the succeeding step will not be executed. This feature comes handy when doing debugging and what-if analysis. 

 The central white area is the designer canvas where we actually place the transformation/job steps. An example is shown below:


Basics of Pentaho
Fig. 3. Screenshot displaying a simple transformation

Job Design

Designing a PDI job is similar to designing a PDI transformation. A simple job design is shown below:

Pentaho 7.1 Tutorial
Fig. 4.Screenshot showing a simple job

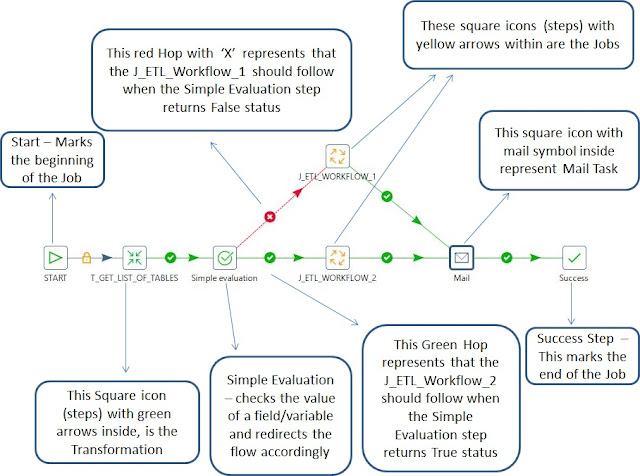
Similar to a transformation, a PDI job also has hops connecting the steps but with additional workflow controlling options (which are not available in the transformation) that can be accessed by right-clicking the hop and selecting Evaluation containing the below settings:

1.     Unconditional: It is shown as a lock symbol and it means the step at the end (right side) of the hop is independent of the step at the beginning (left side) of the hop which means the steps would start executing without waiting for other steps to complete as soon as the job is started.
2.     Follow when result is True: This is indicated by a green circle with check symbol. This setting means the succeeding step should be executed only when the preceding step returns a True status (in case of simple evaluation step) or only when the preceding step is completed.
3.     Follow when result is False: This settings is opposite in function to previous setting and this allows the succeeding step to execute only when the preceding step returns a False status in simple evaluation. This mode is displayed as red circle with 'X' inside.

Notes

            We can add descriptive comments on transformation and jobs using a feature called Notes by right-clicking anywhere in the design canvas and selecting new note.
Pentaho Data Integration Tutorial ppt
Fig. 5. Note placed in PDI job

General Features

PDI is a java based tool and it has cool features like support for connecting with wide range of sources :

·         Databases - Traditional RDBMS like Oracle, Sql Server, MySQL, etc.

·         Big Data Databases like Hive

·         JSON files

·         HL7 files

·         MS Excel files

·         MS Access files

·         csv files

·         txt files

·         xml files

·         SAP

·         SAS

·         SalesForce data

·         Yaml

·         RSS feeds

·         Google Analytics

·         Email messages


It also has the ability to output the data to various kinds of target DB/files,  Metadata Injection support, Row normalizer/denormalizer and we can create our own custom transformation step using Javascript.

It has very good documentation of its various Transformation as well as Job level steps available online that we can refer. Apart from this, there is also active community forums on the web where we can find answers to questions related to design practices, performance tuning, etc by the expert developer members.


Saving the Transformation/Job

The Jobs and Transformations created can be stored in three ways: 

1. Saving the jobs/transformation in the local file system:
The files will be stored in the local machine's file system. This can be used for learning and training purposes. This is not ideal for Production environments.

2. Saving in Pentaho Repository: 
This method is recommended by Pentaho for Production environments. It is available only for Enterprise Edition.
  • It has high-level security.
  • Locking of the files for writing while permitting specific users to make changes.
  • Maintains version history of the jobs/transformations and in case of any mishap in the recently deployed (moving the developed the jobs/transformations to Production environment from Development after testing) files, we can revert back to previous version of the same jobs/transformations. In general, the Pentaho Repository is managed by Pentaho Administrator.  

3. Using a database as a repository:
In this approach, we will use a database to store the ETL metadata info and again this is also not supported or recommended by Pentaho for Production usage.

Product License

PDI aka Kettle comes with two licensing options:

  • Community Edition (CE)
  • Enterprise Edition (EE)

The Community Edition has all the features that are present in Enterprise Edition but the Enterprise Edition comes with additional plugins and product support.

Summary of the Post

To Summarize the various topics that we have seen in this post,

1. General Overview of PDI as an ETL tool.

2. Detailed differences between a PDI Job and Transformation.

3. User Interface and layout of the Spoon window.

4. General idea on how a  Pentaho Job and Transformation would look like using simple examples.

5. List of the sources where the data can be extracted and other features.

6. Repository types.

7. PDI License options.

Even if you had already worked with some other ETL tools, you would definitely think why other tools are not this simple. Even I felt the same.We can easily prototype our design ideas quickly. In the upcoming posts, we will be working with Community Edition of Kettle which is open-source and free to download. 

Please feel free to comment your thoughts about this post, that way I can update the comments. Also let me know in the comments section if you want me to explain any topics on PDI.